If you’ve ever dumped out a tin of assorted needles and had absolutely no idea which one to reach for, you’re not alone. Needles are one of those things nobody teaches you about, you just sort of inherit a pincushion full of mystery and hope for the best. But the truth is, the needle you choose has a huge effect on how your stitching looks and feels. The right needle glides through fabric like it was never even there. The wrong one snags threads, leaves visible holes, or makes your hands ache after ten minutes.
So let’s fix that. Here’s everything you actually need to know about hand sewing needles — sizes, types, fabric pairings, quality, and yes, self-threading needles you can stitch with confidence instead of guesswork.
How Needle Sizing Actually Works
This trips up almost everyone at first: the higher the number, the smaller and finer the needle. A size 3 needle is thick and long; a size 10 is short and delicate. It’s the opposite of what feels intuitive, but once it clicks, it clicks for good.
Sizing isn’t universal across needle types, either. A size 8 embroidery needle and a size 8 sharps needle aren’t identical, each category has its own size range, generally running from about 1 (thick, for heavy work) to 10 or 12 (fine, for delicate work). The type of needle you’re using matters just as much as the number stamped on the packet.
A good rule of thumb: match the needle’s thickness to your thread, and match its sharpness and length to your fabric. If thread struggles to pass through the eye without fraying, size up. If you’re leaving visible holes in delicate fabric, size down.
The Needle Types Every Hand Sewist Should Know
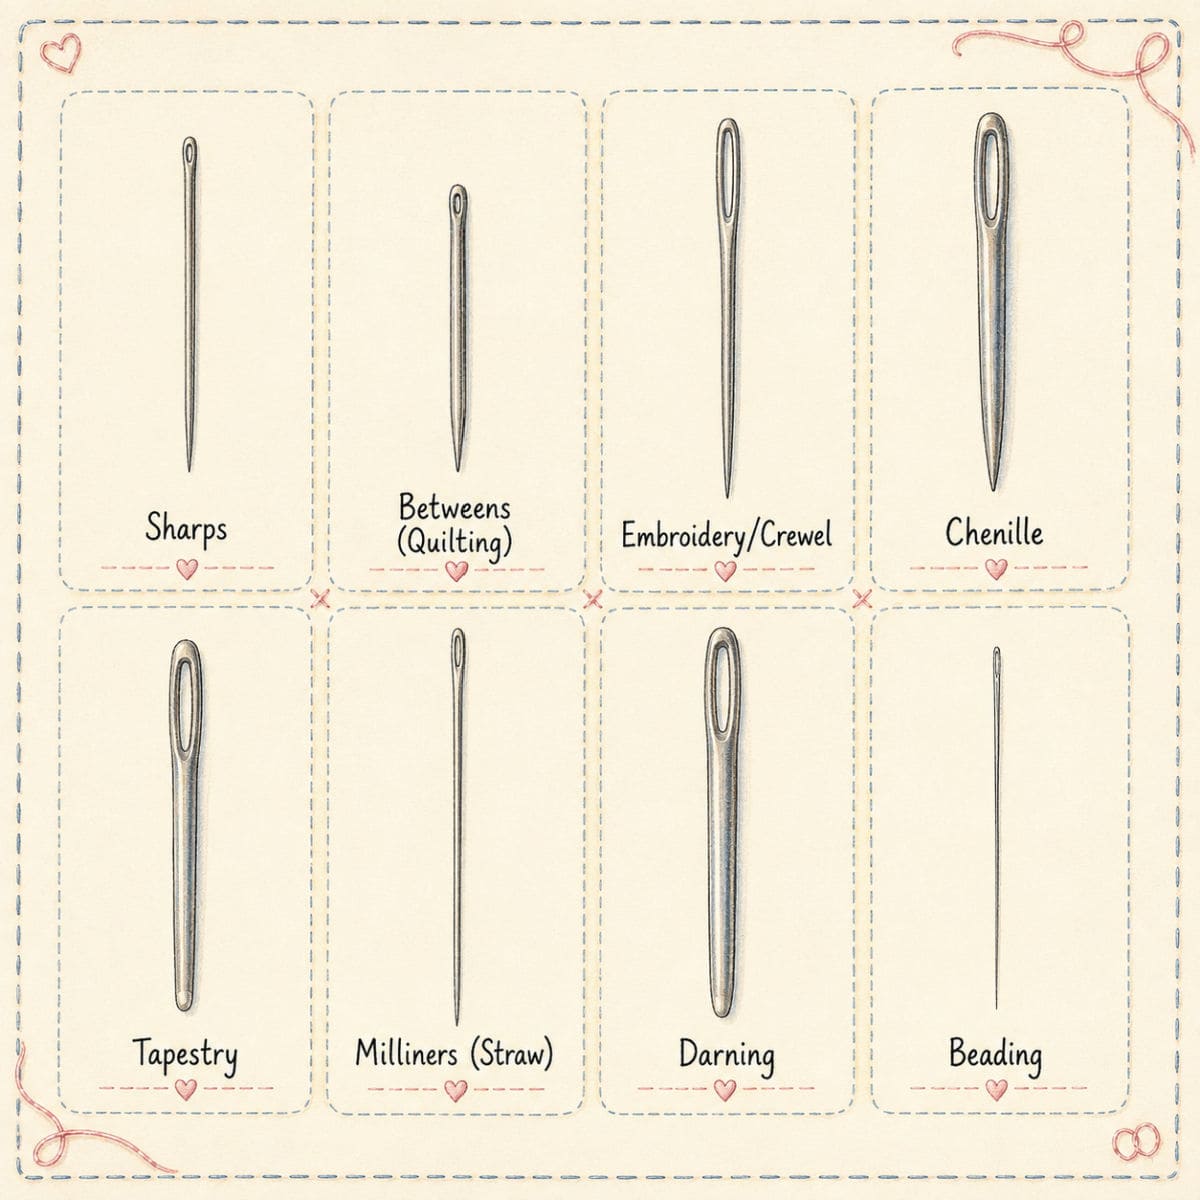
Sharps
These are the all-purpose workhorses; medium length, round eye, sharp point. If you only own one type of needle, this is probably it. Sharps are ideal for general hand sewing, seams, and construction work on woven fabrics like cotton, linen, and quilting cottons.
Betweens (Quilting Needles)
Short and sturdy with a small, round eye, betweens are built for precision. Quilters love them because their short length allows for small, even stitches, but they’re wonderful for any fine hand-finishing work too; hems, appliqué, and detail stitching where control matters more than reach.
Embroidery/Crewel Needles
These have the same sharp point as a sharps needle but a longer eye, designed to accommodate embroidery floss or multiple strands of thread without shredding them. If you’re doing any kind of decorative surface stitching, this is your needle.
Chenille Needles
Similar to embroidery needles but with a larger, longer eye and a sharp point built for thicker threads like ribbon, wool, or perle cotton. Great for ribbon embroidery or heavier decorative work
Tapestry Needles
Blunt tip, large eye. Because the point is rounded rather than sharp, tapestry needles slide between threads rather than piercing fabric they are perfect for cross-stitch on even-weave fabric, needlepoint, or weaving in ends without splitting your stitches.
Milliners (Straw) Needles
Long and uniformly thin from eye to point, milliners needles are the secret to beautifully even hand-rolled hems, gathering, and bullion stitches. Their consistent width lets you wrap thread around the shaft smoothly for French knots and bullion roses.
Darning Needles
Long, thick, blunt-ish needles designed for mending and reweaving holes in knits, darning socks, or working with yarn. Their length lets you weave in and out repeatedly without constantly re-threading.
Beading Needles
Extremely thin and flexible, built to pass through tiny bead holes. Not useful for general sewing, but essential if your project touches embellishment work.
Matching Needle to Fabric
This is where most sizing confusion actually resolves itself; think fabric first, needle second.
- Delicate fabrics (silk, chiffon, fine linen, lawn): Fine sharps or milliners needles, sizes 9–12. A finer needle leaves a smaller hole and won’t distort delicate weaves.
- Quilting cottons and medium-weight wovens: Sharps or betweens, sizes 7–9. This covers the vast majority of everyday sewing and mending.
- Linen (medium to heavy): Sharps sizes 5–8 depending on weight; a slightly sturdier needle handles linen’s crisp hand better than a very fine one.
- Wool and heavier woven fabrics: Sharps or chenille needles, sizes 3–6, since you need a bit more strength to move through denser fibers.
- Knits and jersey: A ballpoint hand needle if you have one, which slides between the loops of knit fabric rather than piercing them , this prevents runs and snags.
- Denim and canvas: Heavy-duty sharps or even a glover’s needle for very thick layers, sizes 1–4.
- Felt and wool applique: Embroidery or crewel needles work beautifully since the longer eye handles embroidery floss for decorative stitching.
- Cross-stitch and needlepoint on even-weave fabric: Tapestry needles, sized to the fabric count (higher thread count, finer needle).
Needle Quality: What Actually Matters
Not all needles are created equal, and this is one area where it really is worth spending a little more.
Nickel-plated vs. gold-eye vs. platinum-plated:
- Nickel-plated needles are the standard, budget-friendly option. They work fine but can dull faster and occasionally cause a faint discoloration on fabric over long projects, especially if you have any skin sensitivity to nickel.
- Gold-eye needles have a gold-plated eye (not the whole needle) which makes threading easier because the eye reflects light and thread glides through more smoothly. Handy for anyone who struggles to thread needles.
- Platinum-plated needles resist tarnish and glide more smoothly through fabric over time, and are a nice option for those with nickel sensitivities.
Signs a needle has gone bad:
- A dull point that pushes or tears fabric instead of piercing it cleanly
- A bent shaft, even a slight one, which throws off your stitch tension and angle
- Rough spots or burrs (often from rust) that snag thread as it passes through
- Discoloration or a “sticky” drag as it moves through fabric
Needles are genuinely a consumable, not a lifetime purchase. A needle used regularly for a big project should be replaced every few months. If you notice yourself needing to tug or push harder than usual, that’s your needle telling you it’s done.
Storage matters too. Needles rust quickly in humid environments, so keep them in a needle case, felt keeper, or a pincushion with a bit of emery (a small strawberry-shaped attachment on many vintage pincushions was originally filled with emery powder specifically to clean and sharpen needles as you pushed them in and out , just a lovely bit of old sewing-room wisdom that still works today).
Self-Threading Needles: Worth It or Not?
Self-threading (or “calyx-eyed”) needles have a small slit at the top of the eye instead of a closed loop, letting you pull thread down through the slit rather than pushing it through a hole. They’re a genuine lifesaver for anyone who struggles with eyesight, hand steadiness, or just general threading frustration.
- The trade-offs to know:
- The open slit means the eye is technically weaker and can occasionally let thread slip back out mid-stitch, especially with slippery threads like silk.
- They tend to come in a more limited size range than standard needles, so you may not find one fine enough for delicate embroidery work.
- The slit can also snag fabric slightly more than a smooth closed eye if you’re not careful with your stitching angle.
They’re a wonderful tool to keep in your kit, especially for quick mending or when you’re working in poor light, but for detailed embroidery or projects where thread stability really matters, most experienced stitchers still reach for a standard needle and a needle threader instead. A simple wire needle threader is inexpensive, takes up no space, and solves 90% of the threading frustration people blame on the needle itself.
A Quick Reference: Needle Size at a Glance
| Needle Type | Best For | Typical Size Range |
|---|---|---|
| Sharps | General sewing, wovens | 1–12 |
| Betweens | Quilting, fine hand-finishing | 3–12 |
| Embroidery/Crewel | Floss, decorative stitching | 1–10 |
| Chenille | Ribbon, thick decorative thread | 13–26 |
| Tapestry | Cross-stitch, needlepoint | 13–28 |
| Milliners/Straw | Hems, French knots, bullion stitches | 1–11 |
| Glover’s/Leather | Leather, suede, heavy canvas | 1–10 |
| Darning | Mending, reweaving | 1–9 |
How to Identify a Mystery Needle (When It’s Out of the Packet)
Almost everyone who sews ends up with a pincushion full of unlabeled needles at some point — a few slipped out of their packet, some got inherited from a grandmother’s sewing box, others just migrated over time until nobody remembers which is which. Here’s how to sort them out without guessing.
Look at the eye first. The eye tells you more than almost anything else:
- A small, round eye usually means sharps or betweens (general sewing/quilting).
- A long, narrow eye means embroidery or crewel (built for floss).
- A very large, long eye means chenille or tapestry (built for thick thread or yarn).
- A slit at the top instead of a closed hole means it’s self-threading.
Check the point. Run the tip lightly across your fingertip (gently!) or look at it under good light:
- Sharp and needle-fine = sharps, betweens, embroidery, milliners.
- Rounded and blunt = tapestry or darning needle, meant to slide between threads rather than pierce them.
- Triangular or wedge-shaped (you can sometimes feel distinct flat edges when you roll it between your fingers) = glover’s/leather needle.
Compare length and thickness side by side. This is the single most useful trick: lay unknown needles next to a needle you do know the identity of.
- Short and sturdy = betweens.
- Long and uniformly thin from end to end = milliners/straw needles.
- Long, thick, and blunt = darning needles.
- Medium length, medium thickness = the classic sharps, your default.
Use a needle gauge or sizing chart. Inexpensive metal needle gauges (small cards with graduated holes) let you drop a needle in to find its exact diameter, which narrows down both size and likely type. Many needle brand packets also print a small diagram of eye/point shapes on the back — worth keeping one packet of each type as a reference card in your kit.
Do a quick fabric test. If you’re still unsure, try the needle on a scrap of woven cotton:
- Glides through cleanly and easily = sharp point, general-purpose type.
- Catches or resists slightly, sliding more than piercing = blunt tip, likely tapestry or darning.
- Snags or tears the weave = leather/glover’s needle, wrong tool for woven fabric.
Prevent the problem going forward. A few small habits save a lot of future guesswork:
- Keep a labeled needle case or needle book with sewn-in fabric pages for each type, rather than a single shared pincushion.
- Save one empty packet from each needle type you own and drop loose needles of that type back into it.
- Use a strawberry emery pincushion attachment to store “working” needles separately from your labeled stash — that way mystery needles stay contained to one small spot instead of spreading through your whole kit.
- If you sew with more than one thread weight regularly, consider color-coding — a small dab of nail polish on the head of needles used for a specific purpose (like a personal “wool only” needle) makes them instantly recognizable at a glance.
The Simplest Way to Build Your Needle Kit
You don’t need one of every needle type to get started, most hand sewing projects are well served by a small, thoughtful kit:
- A pack of assorted sharps (covers general sewing)
- A few betweens for fine hand-finishing
- An embroidery/crewel needle or two for decorative touches
- One milliners needle for hems and French knots
- A self-threading needle or wire threader as backup
From there, add specialty needles as your projects call for them. Over time you’ll develop a feel for which needle wants to be in your hand before you even glance at the size printed on the packet and that instinct, more than any chart, is really what makes hand sewing feel effortless.