I still remember seeing push-pin ornaments when I was a little girl. My mom and aunts made them, and to me they looked like the most elegant things in the world. They had all the magic: satin ribbon, pearl beads, sequins, tiny gold trim, and those little straight pins that somehow turned a plain foam ball into something that looked like it belonged in a department store window.
Looking back, I can see why I loved them so much. They were shiny, fancy, and a little over the top in the very best way. They caught the Christmas tree lights beautifully, and each one looked handmade because it was handmade.
What Are Push-Pin Ornaments?
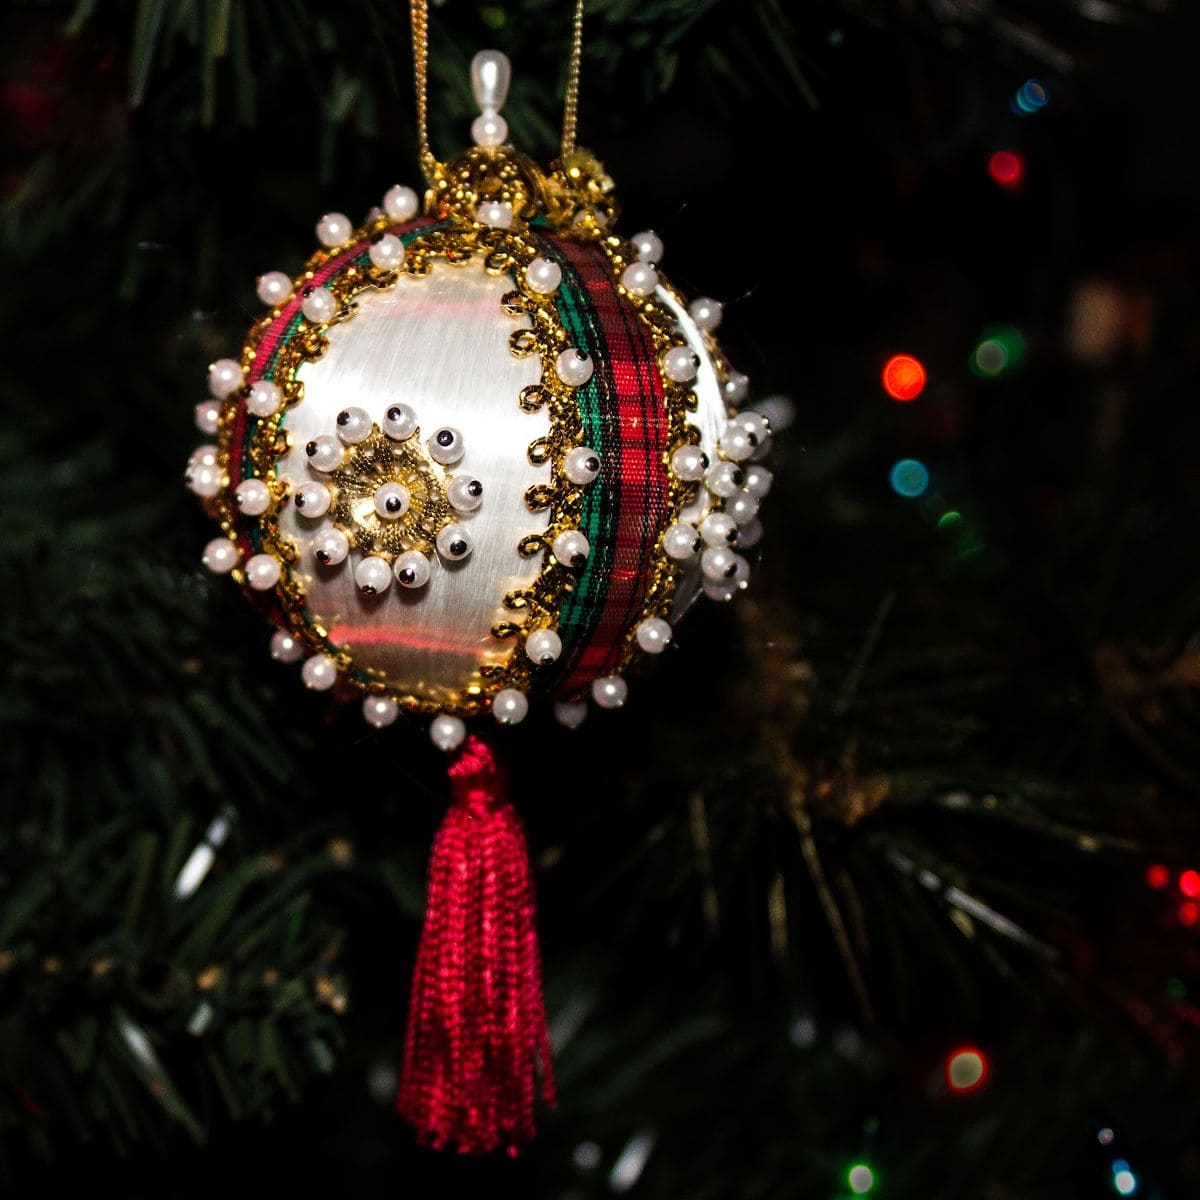
Push-pin ornaments, sometimes called beaded sequin ornaments or satin ball ornaments, are made by pinning sequins, beads, ribbon, braid, faux pearls, and other trims into a foam base. The base was often a Styrofoam ball, bell, egg, cone, wreath, or other holiday shape.
The pins did all the work. A crafter would layer a sequin, bead, or decorative trim onto a straight pin, then push it into the foam. Row by row, the plain base disappeared under a pattern of sparkle.
Some ornaments were simple, with just rows of sequins. Others were wonderfully elaborate, with velvet ribbon, gold braid, dangling beads, tassels, faux jewels, and pearl-headed pins. The finished ornaments could look Victorian, mid-century, glamorous, or delightfully kitschy depending on the colors and trims used.
Why They Were So Popular in the 1960s and 1970s
Push-pin ornaments fit beautifully into the home-crafting boom of the 1960s and 1970s. Many families made Christmas decorations at home, and craft kits made it easier to create something that looked polished without needing advanced sewing, painting, or woodworking skills.
They were also a perfect holiday-table craft. You could sit with a tray of sequins, beads, ribbon, and pins while watching TV or talking with family. It was the kind of craft that invited a little fussing and a lot of creativity.
Companies such as Walco, LeeWards, Bucilla, Fibre-Craft, and other craft suppliers sold ornament kits with many of the pieces included. Some kits made one special ornament, while others made a small set. But plenty of people also made them from loose craft supplies: foam balls, straight pins, sequins, beads, ribbon scraps, and trims saved from other projects.
That may be part of the charm. No two handmade push-pin ornaments were exactly alike.
How Push-Pin Ornaments Were Put Together
The basic method was simple, but the finished look could be very fancy.
A typical ornament started with a foam shape. Many crafters wrapped the ball or shape with satin ribbon first, especially if they wanted that smooth, elegant base color to show through. Others covered the entire surface with sequins and beads.
The design was usually built in layers:
- A ribbon or trim was pinned around the center of the ornament.
- Sequins were pinned in rows or patterns.
- Beads or faux pearls were added on top of the sequins.
- Decorative braid, cording, or lace covered the seams.
- A hanging loop was added at the top.
- Some ornaments were finished with a tassel or bead drop at the bottom.
The trick was patience. You had to keep the rows even, overlap the sequins neatly, and push the pins in firmly without bending them. A thimble was helpful because after a while, all that pin pushing could be hard on the fingers.
What Supplies Were Used?
Common supplies included:
- Styrofoam balls, bells, eggs, cones, or wreath forms
- Straight pins or pearl-headed pins
- Sequins
- Seed beads
- Faux pearls
- Satin ribbon
- Velvet ribbon
- Metallic braid or cording
- Lace or trim
- Tassels
- Small rhinestones or faux jewels
- Thread, cord, or wire for the hanger
The prettiest ones often had a layered look: satin underneath, braid around the center, sequins in careful rows, and beads pinned over the top. Even simple materials could look surprisingly expensive once the ornament was finished.
How Much Did They Originally Cost?
The exact original cost is hard to pin (pun intended) down because these ornaments were made in several ways. Some were made from kits, and others were made from supplies already on hand.
As a home craft, they were generally affordable. A crafter could buy a foam ball, a packet of sequins, straight pins, and a little ribbon or trim for a modest amount. If supplies were already in the sewing basket, the cost per ornament could be very low.
Vintage kits from the early 1970s often appear today as collectible “new old stock” craft kits, but their current prices are much higher than their original retail cost. Today, vintage completed push-pin ornaments commonly sell for around $15 to $25 each, and more elaborate or collectible examples can sell for more. That current value says a lot about how much nostalgia is attached to them.
For a 1960s or 1970s family, though, the appeal was that you could make something beautiful without spending department store ornament money. A handmade ornament could look rich, sparkly, and elegant, even though it was made at the kitchen table.
Why They Looked So Elegant
Part of the elegance came from the materials. Satin, pearls, sequins, gold braid, and rhinestones all read as “fancy,” especially under Christmas tree lights.
The other part came from the time involved. You could tell someone had sat and made the ornament one pin at a time. These were not quick throwaway decorations. They had weight, texture, and detail.
A push-pin ornament also had a wonderful handmade imperfection. Maybe one row of sequins leaned a little. Maybe one bead was slightly off-center. But that was part of the beauty. Each ornament carried the hand of the person who made it.
Are Push-Pin Ornaments Collectible Today?
Yes, especially among people who remember them from childhood or love vintage Christmas decorations. They have the same kind of nostalgic pull as ceramic Christmas trees, aluminum trees, Shiny Brite ornaments, bottle-brush trees, and handmade felt ornaments.
Collectors often look for ornaments that are intact, clean, and not missing too many pins, beads, or sequins. Satin can snag or discolor over time, and older foam can become fragile, so condition matters.
Still, even ornaments with a little wear can be lovely. A tiny bit of aging often makes them feel even more like something pulled from a grandmother’s Christmas box.
Tips for Making Them Today
If you want to make a push-pin ornament today, start with a simple design. A foam ball, a roll of ribbon, a few packets of sequins, seed beads, and straight pins are enough to begin.
A few helpful tips:
- Use a thimble to protect your fingers.
- Work over a tray so tiny beads and sequins do not scatter everywhere.
- Plan your centerline first so the ornament looks balanced.
- Use braid or ribbon to cover seams.
- Keep your first ornament simple.
- Save the more elaborate pearl-and-rhinestone masterpiece for later.
This is also a wonderful craft to do slowly. It is not a race. Put on a Christmas movie, pour a cup of coffee or tea, and enjoy the sparkle.
A Craft Worth Remembering
Push-pin ornaments are one of those crafts that instantly take people back. For me, they bring back memories of watching my mom and aunts make something that seemed impossibly fancy out of pins, beads, ribbon, and patience.
They were sparkly. They were elegant. They were a little dramatic.
And honestly, that is still exactly why they are so wonderful.